
Crafty season
How to make a book page pumpkin
The leaves are beginning to change color and the air is turning frosty. As the season transitions from summer joys to winter chills, so can the inside of your house. But, by using this festive holiday decoration, you can you truly capture the season in your home. Below are the following instructions for crafting a seasonal table centerpiece.
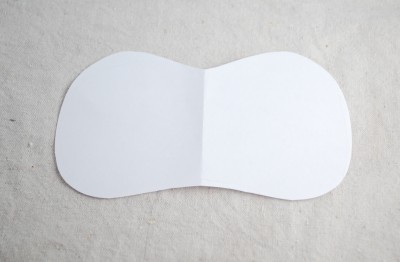
- Make a pumpkin shape out of a piece of paper. Roughly draw pumpkin shape and then fold the paper in half and cut it. By doing this, the pumpkin will be symmetrical.
- Find an old book. Make sure the pages of the book are not too crinkled or that they are not torn. If the pages are in bad shape then the pumpkin will not take the right form when it is all done.
- Take the cover off the book. Gently remove the cover from both sides of the book and the spine. Make sure this is done slowly to ensure that the binding of the book is not damaged.
- Place the pumpkin template over both sides of the book. Take the template and place it so that the fold is wrapped around the binding. If the template does not fit on the book, then just trim it a little.
- Trace around the edges of the template. Using a pencil, darkly trace around the template on both sides of the book.
- Cut out the pumpkin. Using scissors cut through five to six pages at a time.Cut as close to the binding as possible, but do not cut through it. If it’s difficult to get to the edge of the binding with scissors then use an exacto knife there.
- Pull the excess pages off. Once the first few pages are cut, flip the excess paper over to the binding and carefully tear them off.
- Repeat steps 4-7 until the whole book has been cut. When doing this, cut slightly inside the pencil mark each time or the pumpkin will keep getting bigger.
- Take hot glue and attach the front page to the back page. Squirt a thin strip of glue onto the edge of one side. Now, bring the back page around and attach it to the front page. Try to keep the pages as even as possible.
- Stand the pumpkin up. If it is not all filled out, do not panic. Just take your hand and gently arrange them to where you want them to go. If there is a page that just will not stay put, add a little hot glue to the seam.
- Spray paint the book pages. With orange spray paint, lightly dust the pages orange. Be careful not to use too much paint or you will end up with a drenched book.
- Make the stem. Get a small, wide stick from outside and hot glue the bottom part of it. Place the stick through the center of the pumpkin and hold it there until it dries.
- Tie ribbon around the stick. Cut a piece of wide green ribbon and tie it around the stick. This is optional part of the craft, but it does serve to cover all the glue globs.